How it works
The Parts of StoreYourKey
Curious how it works? See the different parts below

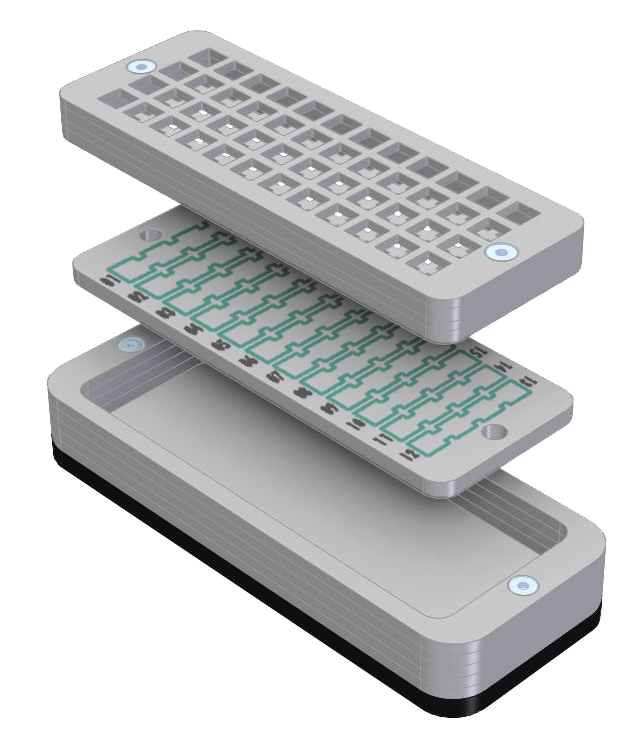
The anvil, rubber plate & Ring
The anvil
Also called a bench block, it is a plate of stainless steel which prevents your stamping blank from warping and ensures that you get nice deep impressions when you punch in the letters.
The rubber plate:
Below the anvil is a rubber plate, to prevent damage to the surface below.
Ring
Keeps the stamping blank and the punch stamp holder in place.
Stamping blank
The stamping blank is where the backup (seed phrase) is punched in.
Punch stamp holder
This unique piece ensures that you can punch in the letters effortlessly and at the right distance. Your letter punches are nice and straight on the stamping blank, which means it's also nearly impossible to hit your fingers.

The Anvil & Rubber Plate & Ring
The anvil
Also called a bench block, it is a plate of stainless steel which prevents your stamping blank from warping and ensures that you get nice deep impressions when you punch in the letters.
The rubber plate:
Below the anvil is a rubber plate, to prevent damage to the surface below.
Ring
Keeps the stamping blank and the punch stamp holder in place.
Stamping Blank
The stamping blank is where the backup (seed phrase) is punched in.
Punch Stamp Holder
This unique piece ensures that you can punch in the letters effortlessly and at the right distance. Your letter punches are nice and straight on the stamping blank, which means it's also nearly impossible to hit your fingers.
How Does it Work
To make things easier, we have created a instruction video.

Part 1:
The punch stamp holder
Part 2:
The anvil, the ring and the rubber plate. This has been pre-assembled by us.
Write down the letters on the blank with a non-permanent fine liner and double check them before and after punching!
Place the stamping blank in part 2 on the anvil. Pay attention to the orientation of the numbers. (Do you want to punch in 1 through 12 or 13 through 24?)
Place the punch stamp holder on the stamping blank.
Now you can start punching in your Seed phrase!
Remember to keep the letter punch straight and to make a good deep impression.
Punch 3 times for a nice deep impression.
The quickest way is to punch in letter by letter instead of word by word. (See tips)
Punch a serial number on the back of both plates (see tips)
Connect the plates with the codes facing each other, using the enclosed stainless steel assembly material
